There's a unique thrill in rediscovering a piece of tech history, especially one that once hinted at the future. For many, that's precisely the experience of encountering the original Apple TV. This isn't just a dusty old box; it's a testament to Apple's early foray into living room entertainment, a surprisingly capable media server, and a fascinating target for hobbyists. From its understated design to its modified Mac OS X core, understanding the collecting, value, and legacy of the original Apple TV offers a rich dive into a pivotal era for personal tech.
At a Glance: Your Quick Guide to the First-Gen Apple TV
- Released: 2006, as Apple's initial dedicated set-top box.
- Purpose: Sync and play media (movies, music, photos) from iTunes, not an App Store device.
- Core Tech: A minimized Mac running a modified Mac OS X Tiger on an Intel Pentium M chip.
- Current Value: Often found for under $15 online, but restoration can add cost and complexity.
- Collecting Appeal: A piece of Apple history, a project device for modders, or a retro media hub.
- Key Challenges: Internal hard drives may be wiped, leaking capacitors are common, and disassembly requires care.
- Refurbishment: Possible with skill and the right tools, including fixing common capacitor issues.
- OS Reinstallation: Achievable via USB drive and OpenELEC, restoring factory functionality.
More Than a Box: The Enduring Allure of Apple's First TV Effort
Before streaming sticks became ubiquitous and "Apple TV" meant a comprehensive App Store experience, there was a pioneer. In 2006, Apple launched its first-generation set-top box, simply named Apple TV. It was a compact, relatively inexpensive, and user-friendly device, but its vision differed significantly from what we understand as Apple TV today. This initial iteration wasn't about apps or third-party streaming services; it was about bringing your iTunes library – your carefully curated collection of movies, music, and photos – from your computer directly to your television screen.
This wasn't Apple's first dance with the idea of a living room media hub; they had explored similar concepts, like the "Mac of the time" project, as far back as the 1990s. But the 2006 release marked their serious commitment. For collectors and tech historians, this device represents a fascinating stepping stone, showcasing Apple's evolving strategy in home entertainment and setting the stage for future, more ambitious products.
What You're Really Getting: Specs and Design Deep Dive
The original Apple TV is far more than its humble exterior suggests. It's an intriguing blend of familiar Apple design principles and a surprisingly robust internal architecture, essentially a macOS machine distilled into a sleek, quiet box.
Under the Hood: A Mac in Mini-Form
Peel back its layers, and you'll find a minimized Mac experience. The first-generation Apple TV runs a modified version of Mac OS X Tiger (10.4), powered by an Intel Pentium M chip clocking in at 1GHz. Graphics are handled by an Nvidia GeForce Go 7300 GPU, complemented by 256MB of RAM. While officially supporting 256MB, dedicated enthusiasts have even found ways to hack it to 512MB, pushing the device's limits.
Connectivity was impressive for its time, featuring essential rear ports for power, USB, and Ethernet. For video output, it offered both HDMI and component video, catering to a range of televisions. Audio was covered with analog stereo and optical audio (TOSLINK), while built-in WiFi handled wireless networking. Inside, its media storage relied on a standard 2.5-inch ATA hard drive, a component that would become a common point of contention and customization for future owners.
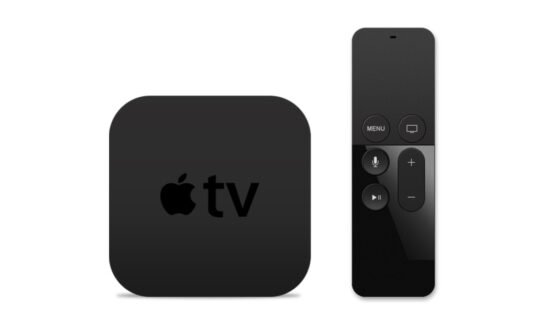
The Outer Shell: Design that Stands the Test of Time
Visually, The original Apple TV sports a design that remains unmistakably Apple. It combines a sturdy metal frame with a clear/white lucite top panel and a matching metal bottom cover. A large, adhesive rubber pad on the underside helps keep it stable and hides the internal screws. This thoughtful construction, while elegant, does present some challenges when it comes to disassembly and maintenance, as we'll explore shortly. For example, that rubber pad, while ensuring stability, often holds onto its glue for dear life, complicating initial access.
The Price Tag Today: Understanding the Original Apple TV's Value
If you're eyeing an original Apple TV for your collection or as a project, you'll likely be pleasantly surprised by the initial asking price. These units often trade hands for very low amounts, sometimes under $15 on platforms like eBay. However, this apparent bargain comes with its own set of considerations.
Why They're So Affordable (and the Hidden Costs)
The low monetary value stems from several factors. Newer Apple TV models offer vastly superior streaming capabilities, app support, and integration with modern services, rendering the first-gen device largely obsolete for casual users. Furthermore, many units available online have had their internal hard drives wiped, meaning they arrive without an operating system, requiring the new owner to perform a software restoration.
However, the "hidden costs" aren't just about software. The device's age means internal components, especially capacitors, are prone to degradation and leakage, leading to hardware failures. Factor in the cost of replacement parts (like new capacitors or a compatible ATA hard drive), specialized tools for disassembly, and the time commitment for refurbishment, and the initial low price can quickly increase.
Beyond Monetary Value: The Collector's Perspective
For many, the value isn't measured in dollars but in historical significance, the joy of tinkering, or the satisfaction of breathing new life into vintage tech. Collecting the original Apple TV offers a tangible connection to Apple's journey in the competitive landscape of home entertainment. It's a device that, while perhaps not a commercial blockbuster, laid crucial groundwork and represents a specific vision for media consumption that Apple held at the time. Its hackability also adds to its appeal, transforming it from a simple media player into a versatile retro computer.
Acquiring Your Own: What to Look For in the Wild
So, you're ready to dive into the world of first-gen Apple TV collecting? Great choice! But approach your acquisition with a keen eye, understanding that you're likely buying a project rather than a plug-and-play solution.
Common Issues to Expect (Wiped Drives, Leaking Capacitors)
When browsing marketplaces, assume the device will need some tender loving care. A common issue is a wiped internal hard drive, meaning the operating system is absent. While this requires an OS reinstallation, it's a manageable fix. More critically, be aware of the internal hardware. The ground truth research confirms that leaking capacitors are a frequent problem, particularly in the power supply. These can manifest as an inability to power on, intermittent functionality, or a completely dead unit. If a listing mentions "leaking capacitors" or vague power issues, prepare for a capacitor replacement project.
Essential Accessories: Don't Forget the Mouse and Remote!
Crucially, the original Apple TV relies heavily on its accessories for initial setup and interaction. Make sure your acquisition includes an original infrared remote. Some bundles, as our ground truth mentions, might even come with a mouse, which can be useful for navigation in certain custom software installations. Without the remote, navigating the initial setup or recovery options becomes incredibly difficult. Verify that these are either included or factor in their separate purchase.
Bringing It Back to Life: A Comprehensive Restoration Guide
Restoring an original Apple TV is a rewarding endeavor, transforming a dormant piece of history into a functional media player. However, it requires patience, specific tools, and a healthy respect for the electrical components within.
Safety First: Essential Precautions for Working Inside
Before you even think about cracking open your Apple TV, remember this critical warning: the power supply contains high-voltage capacitors (up to 250V) that can retain a significant charge even after the device is unplugged. This poses a serious shock hazard. Always unplug the device and, if you plan to work on the power supply, allow several hours for capacitors to discharge naturally. Wearing rubber gloves is also advisable when dealing with the power supply.
Opening the Box: Gentle Disassembly Step-by-Step
The Apple TV's design, while sleek, isn't always repair-friendly. Take your time, especially with the adhesive components.
- Peeling Back the Rubber Foot: Place the device face-down. The large rubber foot is held by strong adhesive. Slowly and carefully pry it up from a corner using your fingers and a wide, flat tool like a spackling knife. Work horizontally, then forward, to separate the two-layered foot from the adhesive. Heating might soften the glue, but often, on older adhesive, it's more about steady, gentle force. Once removed, you'll expose four Torx screws. Use a hobby knife to clear any residual glue from these screws before removing them to detach the bottom cover.
- Freeing the Hard Drive: With the bottom cover removed, you'll see the 2.5-inch ATA hard drive. Flip the bottom cover to access the drive itself. Disconnect its ATA ribbon cable from the motherboard. Then, remove the four Torx screws securing the drive to the cover. This is a good opportunity to clean the drive, cable (with compressed air and a damp cloth), and the inside of the bottom cover.
- A Glimpse at the Motherboard & Battery Check: You'll now have a clearer view of the motherboard. Note the wireless antennae situated above it. You'll also spot a small aluminum heat conduit, which acts as a heat spreader and helps support the bottom cover. It's held by a metal post and a Torx screw. Locate the CR2032 coin-cell battery. Carefully pry it from its holder using a hobby knife, avoiding any shorts or damage. A healthy battery should read around 3.3V DC with a multimeter; if it's low, plan for a replacement, but only install it during reassembly.
- Power On Test (Pre-Reassembly Check): Before going deeper, if you suspect a power issue, you can perform a basic test. Plug the device into power (without the bottom cover, but be mindful of exposed components). A steady amber LED indicates basic functionality. Other error states suggest a more significant hardware failure, often related to the power supply. Again, avoid touching the power supply's exposed components due to the high voltage.
- Fan Finesse: Careful Removal: The internal fan is crucial for cooling specific resistors and capacitors, directing air towards the heat conduit. It's held by three plastic posts with clips. These clips are often brittle with age and can easily break during removal. Use tweezers to gently squeeze the tops of the posts while carefully pulling the fan up. Once free, disconnect its wire.
- General Housekeeping: Dusting It Off: Now's an excellent time for a thorough cleaning. Use compressed air to clear dust from the fan, around the motherboard, and any other nooks and crannies. A soft brush can help with stubborn grime.
Advanced TLC: For the Experienced Enthusiast
These steps delve into more complex repairs and upgrades, suitable for those with experience in electronics repair.
- Navigating the Power Supply (Extreme Caution): This is the most dangerous component to work with due to high voltages. If you need to remove it (e.g., to replace leaking capacitors), ensure the device has been unplugged for several hours. Wear rubber gloves. Remove the three Torx screws securing it, disconnect it from the motherboard, and slowly peel it from its sticky insulating pad. Do not remove this insulating pad from the device itself, as it's crucial for safety. To access internal components, wait for discharge, then remove two plastic clips and tape. You'll find an array of components, including rectifiers, inductors, MOSFETs, and smoothing electrolytic capacitors. It's the electrolytic caps you'll be inspecting for bulging or leakage. Be wary of the hardened white putty often insulating high-voltage components; only remove it if you're replacing the component it covers.
- Motherboard Access for Deeper Cleaning: If you need to clean under the motherboard, you'll need to remove the WiFi card (one screw, two wires) and the aluminum heat conduit (two screws, which might require careful bending for access). The motherboard then slides forward and lifts out. Inspect for any signs of damage, burn marks, or corrosion. You'll see thermal paste on two chips; only disturb this if it appears completely dried out and needs replacement.
- The Ultimate Challenge: RAM Upgrade (Understanding the Risks): The 256MB RAM can theoretically be upgraded to 512MB, but not 1GB. This is an extremely difficult and high-risk modification, not for the faint of heart. It involves:
- Desoldering and resoldering surface-mount DDR2 RAM chips (4 x 64MB Micron).
- Patching the firmware ROM to recognize the new RAM size.
- Soldering delicate "bodge wires" because an address line (thirteen) isn't fully connected on the motherboard for larger RAM chips.
- Reballing and resoldering the Intel G45U chipset controller.
This process demands specialized equipment like a hot air station, SMD preheater, flux, an EPROM USB programmer, and adapters. The firmware's SPD (Serial Presence Detect) data needs modification (e.g., with SPDTool) and re-flashing. One wrong move can permanently destroy your motherboard. Proceed only if you possess advanced SMD soldering skills and are prepared for potential failure.
Putting It All Back Together: Reassembly Tips
Reassembly is largely the reverse of disassembly, but with a few crucial considerations.
- Securing Components & Fan Solutions: Reinstall the motherboard, heat conduit, and WiFi card, ensuring all wires are connected. If you undertook the RAM upgrade, cover any bodge wire areas with Kapton tape for insulation. Reinstall the power supply. When reinstalling the fan, if the plastic clips broke (a common occurrence), use a small dab of hot glue or waterproof caulking on the posts to secure it, then reconnect the fan connector.
- Reattaching the Bottom & Foot: Reconnect the ATA ribbon cable to the hard drive, then secure the bottom cover with its four Torx screws. For the rubber foot, clean any excess glue from the bottom cover. Apply small amounts of Tacky Glue (avoid rubber cement, which often dries out and loses adhesion over time) in the corners and center of the foot. Press it firmly into place and apply a heavy object on top until the glue is completely dry to ensure a lasting bond.
Reviving the Software: Getting Your Apple TV Running Again
Even with perfect hardware, a wiped hard drive means no OS. Thankfully, the community has provided a robust solution using OpenELEC.
The OpenELEC Solution: USB Drive Boot & Factory Restore
You'll need a USB thumb drive and a computer to flash an image to it. The recommended image is factoryrestore-3.0.2.img. Tools like BalenaEtcher are excellent for this.
- Prepare the USB Drive: Use BalenaEtcher (or similar software) to flash the
factoryrestore-3.0.2.imgto your USB thumb drive. - Connect and Boot: Plug the USB drive into the Apple TV's USB port.
- Initiate Recovery: With the Apple TV powered on and the amber LED flashing, use the original infrared remote to hold down the MENU button and the + (plus) button simultaneously. Keep holding them until you see activity on the USB drive's light.
- Restore Process: OpenELEC will load, wipe the internal drive, and begin restoring the operating system. After it reboots into Recovery mode, use your remote to select "Factory Restore." The Apple TV will then reboot, restore itself to factory conditions, and enter the default setup sequence, just like it did fresh out of the box.
Syncing Your Media: The iTunes Connection
Remember, the first-generation Apple TV lacks an App Store. Its primary function is to play media synchronized from iTunes. To get your content onto the device:
- Use an Older iTunes Version: You'll need an older Mac or a Windows 7 computer running an compatible version of iTunes. Modern iTunes versions may not recognize this vintage device for syncing.
- Connect and Sync: Connect your Apple TV to your network. Open iTunes on your computer. Your Apple TV should appear as a device. It might display a code on its screen that you'll need to enter into iTunes to establish the connection and begin syncing your movies, music, and photos to its internal hard drive.
Living with a Vintage Apple TV: Capabilities and Quirks in the Modern Age
Having restored your original Apple TV, you now possess a unique piece of tech that operates differently from its modern descendants. Understanding its capabilities and limitations is key to enjoying it.
What It Can Still Do (and What It Can't)
Your refurbished first-gen Apple TV excels at its original purpose: playing synced media. It's perfectly capable of displaying movies, playing music, and showcasing photo slideshows from its internal storage. The HDMI output provides crisp video, and the optical audio ensures good sound quality for music.
However, its age shows when it comes to modern streaming. It cannot directly run apps like Netflix, Hulu, YouTube, or other popular streaming services. Its modified Mac OS X Tiger is too old to support modern web browsers or streaming protocols. Think of it less as a streaming box and more as a dedicated, local media player.
The Joy of Offline Media
In an age dominated by subscription services and constant internet connectivity, the original Apple TV offers a refreshing, almost nostalgic, experience: the joy of offline media. Once your content is synced via iTunes, you're free from buffering issues, internet outages, or licensing changes. It's a robust solution for a curated, personal media library, ideal for a "retro" media room or a secondary TV where reliable local playback is preferred over streaming.
The Unfolding Legacy: Why the First-Gen Apple TV Matters
The story of the original Apple TV isn't just about a single device; it's about Apple's evolving vision for the home, its relationship with its user base, and the enduring appeal of hacking and customization.
A Stepping Stone in Apple's Ecosystem
The first-generation Apple TV was a groundbreaking device for its time. While it didn't achieve the massive success of later Apple products, it demonstrated Apple's persistent interest in extending its ecosystem beyond personal computers and portable devices into the living room. It laid foundational ideas, such as simple user interfaces for media browsing and seamless integration with existing Apple services, that would influence future iterations and eventually lead to the App Store-enabled Apple TV we know today. It was an essential learning experience, defining what worked and what didn't in this new territory.
A Hacker's Delight: The Modding Community
Perhaps one of the most significant aspects of its legacy is its appeal to the modding community. Because it ran a modified version of Mac OS X, it presented an open canvas for enthusiasts. The ability to upgrade RAM (albeit with extreme difficulty), install custom firmware like OpenELEC, or even modify its internal storage to SSDs, turned it into far more than a simple media box. This hackability fostered a dedicated community that kept the device relevant long after Apple moved on, underscoring the enduring power of open-ended hardware design.
Your Next Steps into Vintage Apple Tech
Whether you're looking to create a retro media center, hone your electronics repair skills, or simply own a fascinating piece of Apple's journey, the original Apple TV offers a rewarding project. Start by finding a suitable unit, ideally with its remote. Prepare for potential component replacements, particularly capacitors, and arm yourself with the right tools and a copy of the OpenELEC factoryrestore image.
Embrace the process of bringing this device back to life. You'll not only gain a functional media player but also a deeper appreciation for Apple's design philosophy and the enduring spirit of tinkering that defines the tech community. Enjoy the journey, and happy collecting!